Crochet Boho Plant Pot Cover • Free Crochet Pattern | Scrap Yarn Series
Today I'm going to show you how to make this easy Crochet Boho Plant Pot Cover, an ideal project for all that scrap yarn we all have in our stash!
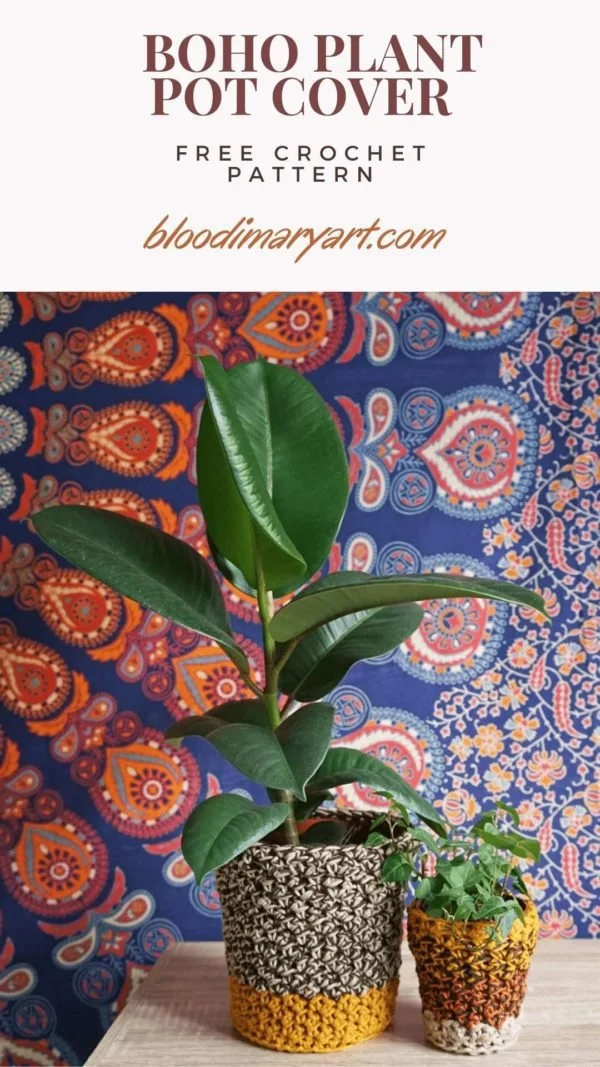
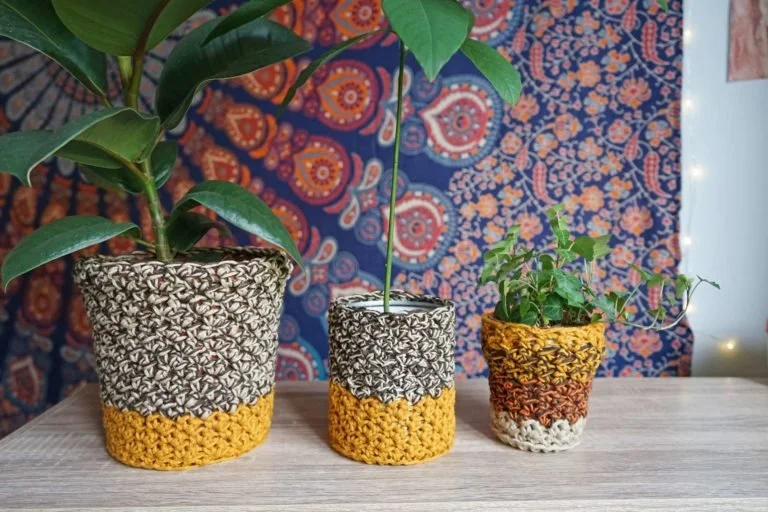
You can find the instructions to make 3 different pot sizes, but the pattern is so easy you can crochet a cover for any pot by changing the number of rows for the base.
MATERIALS:
Category 4 Yarn (Aran or Worsted) or 2 strends of category 3 yarn (Sport Yarn or DK) held together
I've used some scrap yarn, leftover from other projects
Hook 10 mm
Yarn needle
Scissors
Tape Measure
If you prefer the step-by-step video tutorial, you can watch it here!
Abbreviations:
Ch= Chain
Sl St= Slip Stitch
Sl Kn= Slip Knot
Sk= Skip
Ch-sp= Chain Space
Sc= Single Crochet
Scblo = Single Crochet Back Loop Only
Dc= Double Crochet
The beginning ch doesn't count as a stitch.
SMALL POT:
2.5'' base diameter x 4''

Row 1: Ch 5, sl st into the 1st ch to create a loop.
Row 2: Ch 2, 10 dc into the loop, sl st into the 1st st (Tot. 10 dc).
Row 3: Ch 2, 2 dc into each st around,sl st into the 1st st (Tot. 20 dc).
Row 4: Ch 1, 1 scblo into each st around,sl st into the 1st st (Tot. 20 sc).
Row 5: Ch 2, * (1 dc, 1 sc) in the same stitch, sk 1 * Rep between * all around, sl st into the 1st st (Tot. 20 sts)
Repeat Row 5, 9 more times. Cut the yarn and fasten off. Weave in all the ends and your pot cover is ready 🙂
This is my colour choice:
Row 1-5: Cream
Row 6-9: Pumpkin+ Brown
Row 10-12: Mustard + Brown
Row 13-14: Mustard
MEDIUM POT:
4'' base diameter x 5''

Row 1: Ch 5, sl st into the 1st ch to create a loop.
Row 2: Ch 2, 10 dc into the loop, sl st into the 1st st (Tot. 10 dc).
Row 3: Ch 2, 2 dc into each st around,sl st into the 1st st (Tot. 20 dc).
Row 4: Ch 2, * 1 dc into the 1st st, 2 dc into the following st * Rep between * all around,sl st into the 1st st (Tot. 30 dc)
Row 5: Ch 1, 1 scblo into each st around,sl st into the 1st st (Tot. 30 sc).
Row 6: Ch 2, * (1 dc, 1 sc) in the same stitch, sk 1 * Rep between * all around, sl st into the 1st st (Tot. 30 sts)
Repeat Row 6, 11 more times. Cut the yarn and fasten off. Weave in all the ends and your pot cover is ready 🙂
This is my colour choice:
Row 1-9: Mustard
Row 10-16: Cream + Brown
BIG POT:
5'' base diameter x 6.5''

Row 1: Ch 5, sl st into the 1st ch to create a loop.
Row 2: Ch 2, 10 dc into the loop, sl st into the 1st st (Tot. 10 dc).
Row 3: Ch 2, 2 dc into each st around,sl st into the 1st st (Tot. 20 dc).
Row 4: Ch 2, * 1 dc into the 1st st, 2 dc into the following st * Rep between * all around,sl st into the 1st st (Tot. 30 dc)
Row 5:Ch 2, * 1 dc into the first 2 sts, 2 dc into the following st * Rep between * all around,sl st into the 1st st (Tot. 40 dc)
Row 6: Ch 1, 1 scblo into each st around,sl st into the 1st st (Tot. 40 sc).
Row 7: Ch 2, * (1 dc, 1 sc) in the same stitch, sk 1 * Rep between * all around, sl st into the 1st st (Tot. 40 sts)
Repeat Row 7, 14 more times. Cut the yarn and fasten off. Weave in all the ends and your pot cover is ready 🙂
This is my colour choice:
Row 1-9: Mustard
Row 10-21: Cream + Brown
To make a pot cover for bigger sizes, simply keep increasing by 10 each row (ex: in Row 5 you increase every 3 sts, in row 6 every 4 sts, in row 7 every 5 sts etc...)
Thank you for reading,
See you next time!