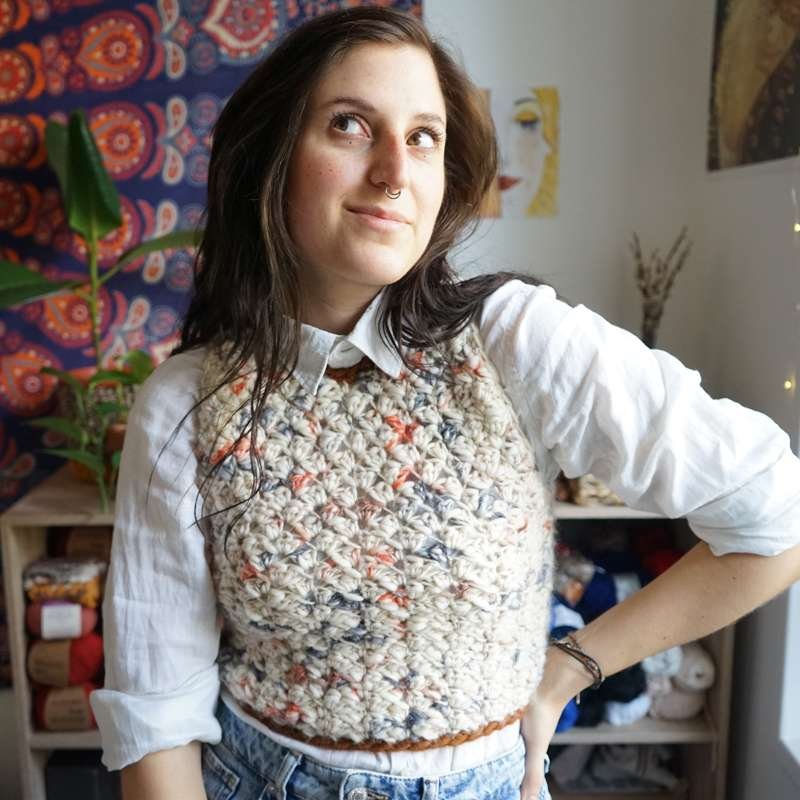
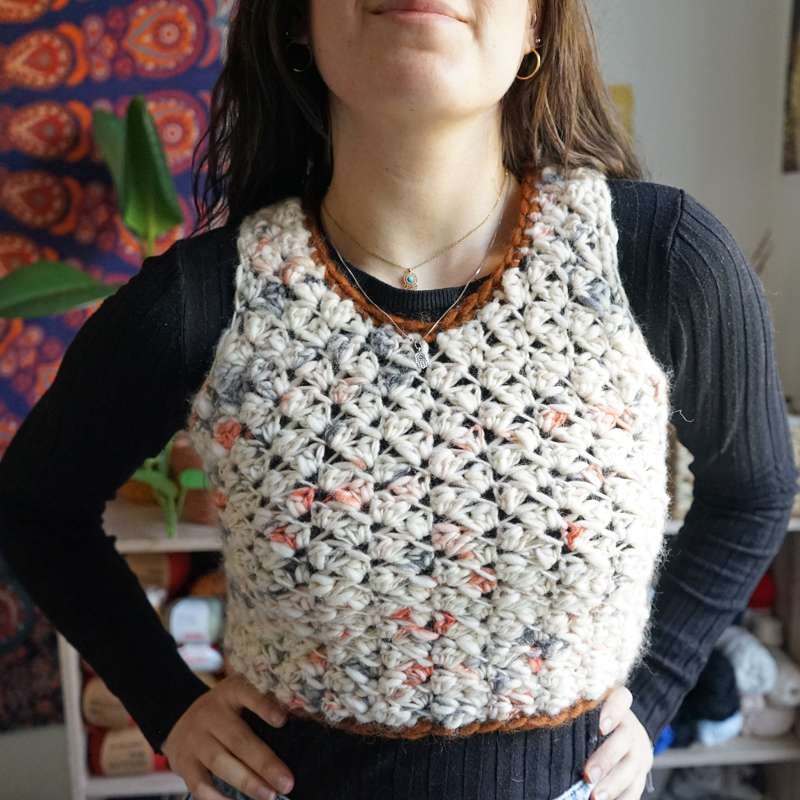
Chunky Vest - Free Crochet Pattern For Beginners
[Video Tutorial + Written Instructions]
Today I'm back with a new full tutorial on how to make this chunky, dreamy, crochet vest!
It's an easy project for advanced beginners and it can be made in any size, using any Worsted/Aran yarn.

It features the Sedge stitch and a contrasting, cute, simple Single Crochet edge around the neck and on the bottom of the vest.
MATERIALS:
Aran/Worsted yarn
For size S, I've used 230 gr/ 230 mt of The Wave Wool in Colorado by We Are Knitters, which has different thicknesses throughout the same skein due to its peculiar spinning.
Using my coupon code MGMFMQWDV, you can get $12 off for orders over $40
(£10 off for orders over £39, €10 off for orders over €39).
You can purchase this yarn HERE
7 mm crochet hook
Yarn needle
Scissors
Stitch markers
Tape measure
If you prefer the step-by-step video tutorial, you can watch it here!
Abbreviations:
Ch= Chain
St= Stitch
Sl St= Slip Stitch
Sl Kn= Slip Knot
Sk= Skip
Sc= Single Crochet
Hdc= Half Double Crochet
Dc= Double Crochet
The beginning ch doesn't count as a stitch.
Both panels are meant to be worked flat (you need to turn your work after each row).
Gauge Swatch:
12 sts x 8 rows of Sedge Stitch = 4 x 4 inches
Front Panel:
To begin, you'll need your BUST MEASUREMENT (the fullest part of your breast).
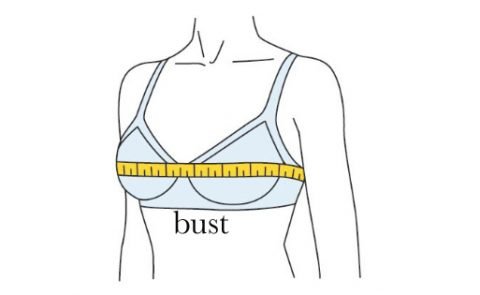
Divide this measurement in half.
My bust is 32 inches and my half bust is 16 inches.
Row 1: Ch an EVEN number of chains that correspond to your HALF BUST MEASUREMENT (remember to stretch the chain when measuring). I'm happy with 36 chains.
(hdc, dc) into 2nd ch from hook, *sk 2, (sc, hdc, dc) into the 3rd ch*. Rep between * all along. You should end the row with 1 ch left, place 1 sc in there.
Row 2: Ch 1, (hdc, dc) into the very 1st st, *sk 2, (sc, hdc, dc) into the 3rd st*. Rep between * all along. You should end the row with 2 sts left, sk 1, 1 sc into the last st.
Repeat Row 2 until you get the right length for your body panel.
The right length should be from your hem to where you want your V neck to sit.
I worked 24 rows for a 9.5 inches total length.
Place a stitch marker into the middle stitch as you'll now going to decrease to create the v neck and the shoulder shaping.
Row 25: Ch 1, sk 3, (sc, hdc, dc) into the 4th st, *sk 2 (sc, hdc, dc) into the 3rd st*. Rep between * all along. You should end with 3 sts (the 3rd one is where you placed the stitch marker). Sk 1, 1 sc in 2nd st.
Depending on which side you're working on first, you might get 2 sts left. Sk 1 and place 1 sc into the last st.
Row 26: Ch 1, sk 3, (sc, hdc, dc) into the 4th st, *sk 2 (sc, hdc, dc) into the 3rd st*. Rep between * all along. You should end with 3 sts, sk 2, 1 sc.
Repeat Row 26 until you get a 3.5 inches wide strap.
Row 29: Ch 1, (hdc, dc) into the very 1st st, *sk 2, (sc, hdc, dc) into the 3rd st*. Rep between * all along. You should end the row with 1 st left, 1 sc into the last st.
Row 30: Ch 1, (hdc, dc) into the very 1st st, *sk 2, (sc, hdc, dc) into the 3rd st*. Rep between * all along. You should end the row with 2 st left, sk 1, 1 sc into the last st.
Repeat Row 30 until you get to the top of your shoulder.
-Remember your vest will stretch out when worn, so don't crochet too many rows!-
Cut a long piece of yarn and fasten off. Attach the yarn on the other side and repeat the same pattern to create another strap.
The instructions are the same, but at the end of Row 1, you'll get 2 sts left (2nd one is the stitch marker). Sk 1 and place a sc into the stitch marked by the stitch marker.
My front panel is 24 rows + 10 v-neck rows.
Back Panel:
The back panel is worked in the exact same way, but the decreasing part is shorter.
I would suggest you count how many rows you worked for the v neck and divide this measurement more or less in half. Half will be added to the body part, half will be your actual decreasing part.
My back panel is 29 rows (24+5) + 5 neck rows.
Joining the Panels:
-Shoulders-
Place the 2 panels flat, with the wrong side facing you. Thread the yarn tail into a tapestry needle and start joining the back panel to the front one by sewing the straps: insert the needle through the external loop of both stitches, always going in one direction. Make sure the stitches are symmetrical.
Weave in the ends and repeat on the other side.
-Armholes-
With the wrong side facing you, join the lateral side of your vest in order to create the armholes.
Make sure you leave enough room for your arms: you can either follow the chart (7. Armhole depth) from the Craft Yarn Council or use your own body measurement as a reference.

I'm happy with 7 inches.
Place a stitch marker to mark the armpit so you'll know when to stop sewing.
Use the same method explained in the shoulder section to join the sides of your vest: the only difference is that you need to insert your needle through the side of the stitches rather than through the loops as you don't have actual stitches.
Edges:
Attach the yarn in any v-neck stitch, ch 1, 1 sc into the same spot, 1 sc into each row around. Cut the yarn and pull up the loop after your last st: thread the yarn into a tapestry needle and insert it through both loops of your 1st st of the round. Insert the needle through the back loop only of your last st.
This will create a seamless join, without any gap or bumpy stitch.
Weave in the ends.
Repeat the same procedure for your armholes.
Repeat the same procedure for the bottom of your vest: attach the yarn in any stitch, ch 1, 1 sc into the same st, 1 sc into each st around. Cut the yarn and pull up the loop after your last st: thread the yarn into a tapestry needle and insert it through both loops of your 1st st of the round. Insert the needle through the back loop only of your last st.
Weave in all the ends and your vest is ready!
Get creative styling your new favourite garment!
Don't forget to tag me @bloodimaryart on Instagram so I can see your recreation!